PyTorch#
This guide describes how to use and install PyTorch, a machine learning framework.
Install or build packages inside an interactive job on the target cluster
Install or build packages using an interactive job on the target cluster (Alex, Fritz, TinyGPU, Woody) to make sure GPU support and hardware features are properly autodetected on initial installation.
For internet access on the compute node, configure a proxy by executing the following lines in your shell inside the interactive job:
Installation via pip/conda#
Preparation#
- Start interactive Job on a cluster node. See cluster documentation page for hints.
-
Load the Python module by executing:
Without loading the Python module the system-installed Python will be used which is pretty old. -
Optional: create and activate a virtual environment:
- For conda see conda environments.
- For Python
venvsee Virtual environments withvenv.
Installation#
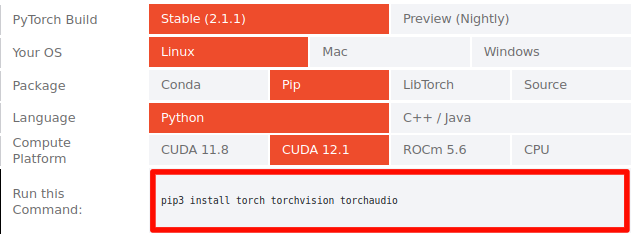
The command line for installing PyTorch depends on several factors.
Go to: https://pytorch.org/get-started/locally/
and select:
- PyTorch Build: Stable
- Your OS: Linux
- Package: Conda or Pip, depending on what package manager you want to use.
- Language: Python
- Compute Platform: choose a CUDA version
The command line to execute will be shown at the bottom of the table.
Test installation#
To check your PyTorch installation is functional and detects the GPU(s) execute the following command on a compute node after loading the Python module and activating the virtual environment you installed it to:
Using Containers#
It is possible to use pre-built Docker images of PyTorch.
On our systems we use Apptainer (previously known as Singularity) instead of Docker. Apptainer allows for downloading and converting a Docker container into its own sif file format.
Avoid big python environments
When building your own conda or pip python environment, many small files will be created in our filesystems. Loading them can cause slowdowns for all users. Avoid this bottleneck by building your own container, which is packaged into a single large file that can be loaded quickly.
Build your own container with pip packages from a .def file#
Use this pytorch.def file to instruct the building of your container with the pip packages listed in requirements.txt:
Bootstrap: docker
From: dockerhub-mirror.rrze.uni-erlangen.de/pytorch/pytorch:latest

%files
    requirements.txt /

%post
    apt-get update -y
    apt-get clean
    pip install -r requirements.txt

%runscript
    exec "$@"
Using existing container#
To download and convert the PyTorch container from DockerHub or Nvidia NGC run:
cd $WORK
export APPTAINER_CACHEDIR=$(mktemp -d)
apptainer pull pytorch-latest.sif docker://pytorch/pytorch:latest        # Docker
apptainer pull pytorch-ngc.sif docker://nvcr.io/nvidia/pytorch:25.09-py3 # Nvidia NGC
rm -r "$APPTAINER_CACHEDIR"
Valid tags can be found under pytorch/tags if you want to install a different one than latest. To get the latest NGC container, replace tag 25.09-py3 with the newest found on the tag page.
Within your job script, you use the container as follows:
In the container /home and /apps are available as they are automatically
bind-mounted.
For a simple test run:
apptainer exec pytorch-latest.sif python3 -c 'import torch; print(torch.cuda.is_available())'
# output when GPUs are usable: True
Increasing performance#
See PyTorch's Performance Tuning Guide. The guide already provides dozens of tips for optimizations.
Increasing performance with torch.compile
PyTorch version >= 2.0 includes torch.compile for speeding up PyTorch scripts.
It may not be compatible to certain model architectures or custom operations.
Usage of torch.compile is trivial (adapted from Getting Started):
import torch

device = "cuda" # assuming we have a GPU available

model = torch.hub.load('pytorch/vision:v0.10.0', 'resnet18', pretrained=True).to(device)
# see https://pytorch.org/docs/stable/dynamo/get-started.html#existing-backends for other backends
model = torch.compile(model, backend="inductor").to(device)
model(torch.randn(1,3,64,64).to(device))
torch.compile uses TorchDynamo,
a Python-level JIT compiler for speeding-up PyTorch scripts. TorchDynamo can use TorchInductor to use Triton as backend for execution on GPUs.
Nowadays when you install a recent PyTorch version (>= 2.0) TorchDynamo, TorchInductor, and Triton are automatically included.
More information is found in the PyTorch documentation, especially:
Notes on parallel training#
Higher level frameworks
The PyTorch based framework PyTorch Lightning with LitGPT comes with built in support for parallel execution and are thus recommended for inexperienced users requiring multi-GPU execution.
Useful links:
- Tutorials on multi-node training using Lightning
- LitGPT quick start
Distributed Data Parallel (DDP) is PyTorch's functionality to easily provide data parallel training. Hereby, the model is replicated across multiple GPUs on one or multiple nodes to speed up training.
For advanced cases where the model needs to be split in order to execute it, PyTorch provides Fully Sharded Data Parallel (FSDP2).
PyTorch already provides fundamental documentation for distributed training general:
- Distributed training
- Overview over
torch.distributed
Documentation related to Distributed Data Parallel:
- Launching and configuring distributed data parallel applications
- Single- and Multi-process Data Loading
- Examples from PyTorch, also including a data partitioner.
- Tutorial, which covers multiple scenarios from data parallel over model parallel and includes with several examples.
torch.nn.parallel.DistributedDataParalleltorch.utils.data.distributed.DistributedSampler
DDP Requirements are:
- Each process must call
torch.distributed.init_process_group()(implicit or explicit). - Each process should use only one GPU, use:
- Call
torch.cuda.set_device(<logical GPU ID>) - Use env. var.
CUDA_VISIBLE_DEVICESfor each process. - User must define how data is distributed, e.g. via
torch.utils.data.distributed.DistributedSampler.
DDP uses the term process group that is comparable to an MPI communicator.
Backends#
DDP has multiple backends:
gloo: CPUs and GPUsnccl: GPUs only, based on NCCL- MPI: but only when PyTorch was manually compiled to include it, does not come with the default installation.
- Common environment variables.
In General nccl is preferred for GPUs as it's faster and supports InfiniBand (IB).
Restrictions of nccl:
- only one model/process per GPU with
nccl - with
gloomultiple processes per GPU are possible, but yields less performance
nccl backend uses the NCCL library:
- Documentation at Nvidia.
- Environment variables
ROCm currently only supports as distributed backend nccl and gloo. See the documentation.
Optional: Launch via torchrun
You can launch your application via torchrun from PyTorch.
In case torchrun is not in your PATH environment variable, i.e., you cannot execute it directly, you can alternatively use:
Launch Python scripts via torchrun on our systems:
torchrunhas to be started on each compute node.- For more than one compute node,
sruncan be used. torchrunrequires some flags to be adjusted for each node, see below in the example scripts.- e.g.
--node-rankmust be assigned a node rank
Notes on srun:
- Add
--cpu-bind=verboseto show affinity or setSLURM_CPU_BIND=verbose. Ideally you want to bind a process closest to the GPU it uses. -
srunsets the following env. vars. that might be useful (see documentation for more): -
SLURM_LAUNCH_NODE_IPADDR: IP address of the node wheresrunwas launched from.- not sure if
torchrunsupports IPv6
- not sure if
SLURM_NODEID: Local node index, ranging from 0 to no. of nodes in the job - 1. Could be used as input for the--node-rankflag, whensrunwould call another wrapper script.SLURM_PROCID: The MPI rank, ranging from 0 to no. of processes to be launched - 1.SLURM_GPUS_ON_NODE: The no. of GPUs available on the current node.SLURM_JOB_NUM_NODES: The total no. of nodes in this job.
Start all torchrun processes at once. Configure torchrun via env. vars. srun sets upon invocation, hence the indirection through running /bin/bash first.
It might be required to change the value of MASTER_PORT, if it is already in use.
#!/bin/bash -l
#SBATCH --ntasks-per-node=1
#SBATCH ... all your typical sbatch options ...

# load modules,
#   module add cuda/...
# activate environments

MASTER_ADDR="$(scontrol show hostnames "$SLURM_JOB_NODELIST" | head -n 1)"
MASTER_PORT=29400

# optional: enable logging and increase log level
# export TORCH_CPP_LOG_LEVEL=INFO
# export TORCH_DISTRIBUTED_DEBUG=DETAIL

srun --cpu-bind=verbose torchrun \
     --nnodes=$SLURM_JOB_NUM_NODES \
     --nproc-per-node=$SLURM_GPUS_ON_NODE \
     --rdzv-id=$SLURM_JOB_ID \
     --rdzv-backend=c10d \
     --rdzv-endpoint="${MASTER_ADDR}":"${MASTER_PORT}" \
     script.py
This tutorial on DDP covers multiple scenarios ranging from data parallel over model parallel and includes with several examples.
This documentation contains examples regarding PyTorch distributed
The following script can be used with torchrun and is taken and adapted with some output from PyTorch's documentation.
#!/usr/bin/env python3
# based on https://pytorch.org/tutorials/intermediate/ddp_tutorial.html#initialize-ddp-with-torch-distributed-run-torchrun
import torch
import torch.distributed as dist
import torch.nn as nn
import torch.optim as optim
from torch.nn.parallel import DistributedDataParallel as DDP
import socket

def setup():
    acc = torch.accelerator.current_accelerator()
    backend = torch.distributed.get_default_backend_for_device(acc)
    dist.init_process_group(backend)

    rank = dist.get_rank()
    print(f"Start running basic DDP example on rank {rank}.", flush=True)

    # We distribute the GPUs on a node round robin over the processes.  Here
    # we assume the ranks on one node are consecutive.
    device_id = rank % torch.accelerator.device_count()

    return device_id


def cleanup():
    dist.destroy_process_group()


class ToyModel(nn.Module):
    def __init__(self):
        super(ToyModel, self).__init__()
        self.net1 = nn.Linear(10, 10)
        self.relu = nn.ReLU()
        self.net2 = nn.Linear(10, 5)

    def forward(self, x):
        return self.net2(self.relu(self.net1(x)))


def demo_basic():

    device_id = setup()

    # Create model and move it to GPU with id rank.
    model = ToyModel().to(device_id)
    ddp_model = DDP(model, device_ids=[device_id])

    loss_fn = nn.MSELoss()
    optimizer = optim.SGD(ddp_model.parameters(), lr=0.001)

    optimizer.zero_grad()
    outputs = ddp_model(torch.randn(20, 10))
    labels = torch.randn(20, 5).to(device_id)
    loss_fn(outputs, labels).backward()
    optimizer.step()

    # Make sure to free the used resources at the end
    cleanup()

if __name__ == "__main__":
    print("main", flush=True)
    demo_basic()